程序化建模#
提示
本篇教程将指导你创建一个参数化的三维箭头模型。
目标#
我们需要不同分辨率,外观,大小的箭头,并且朝向特定的方向。
我们想用修改器来控制这些参数,包括轴和箭头上的材料。
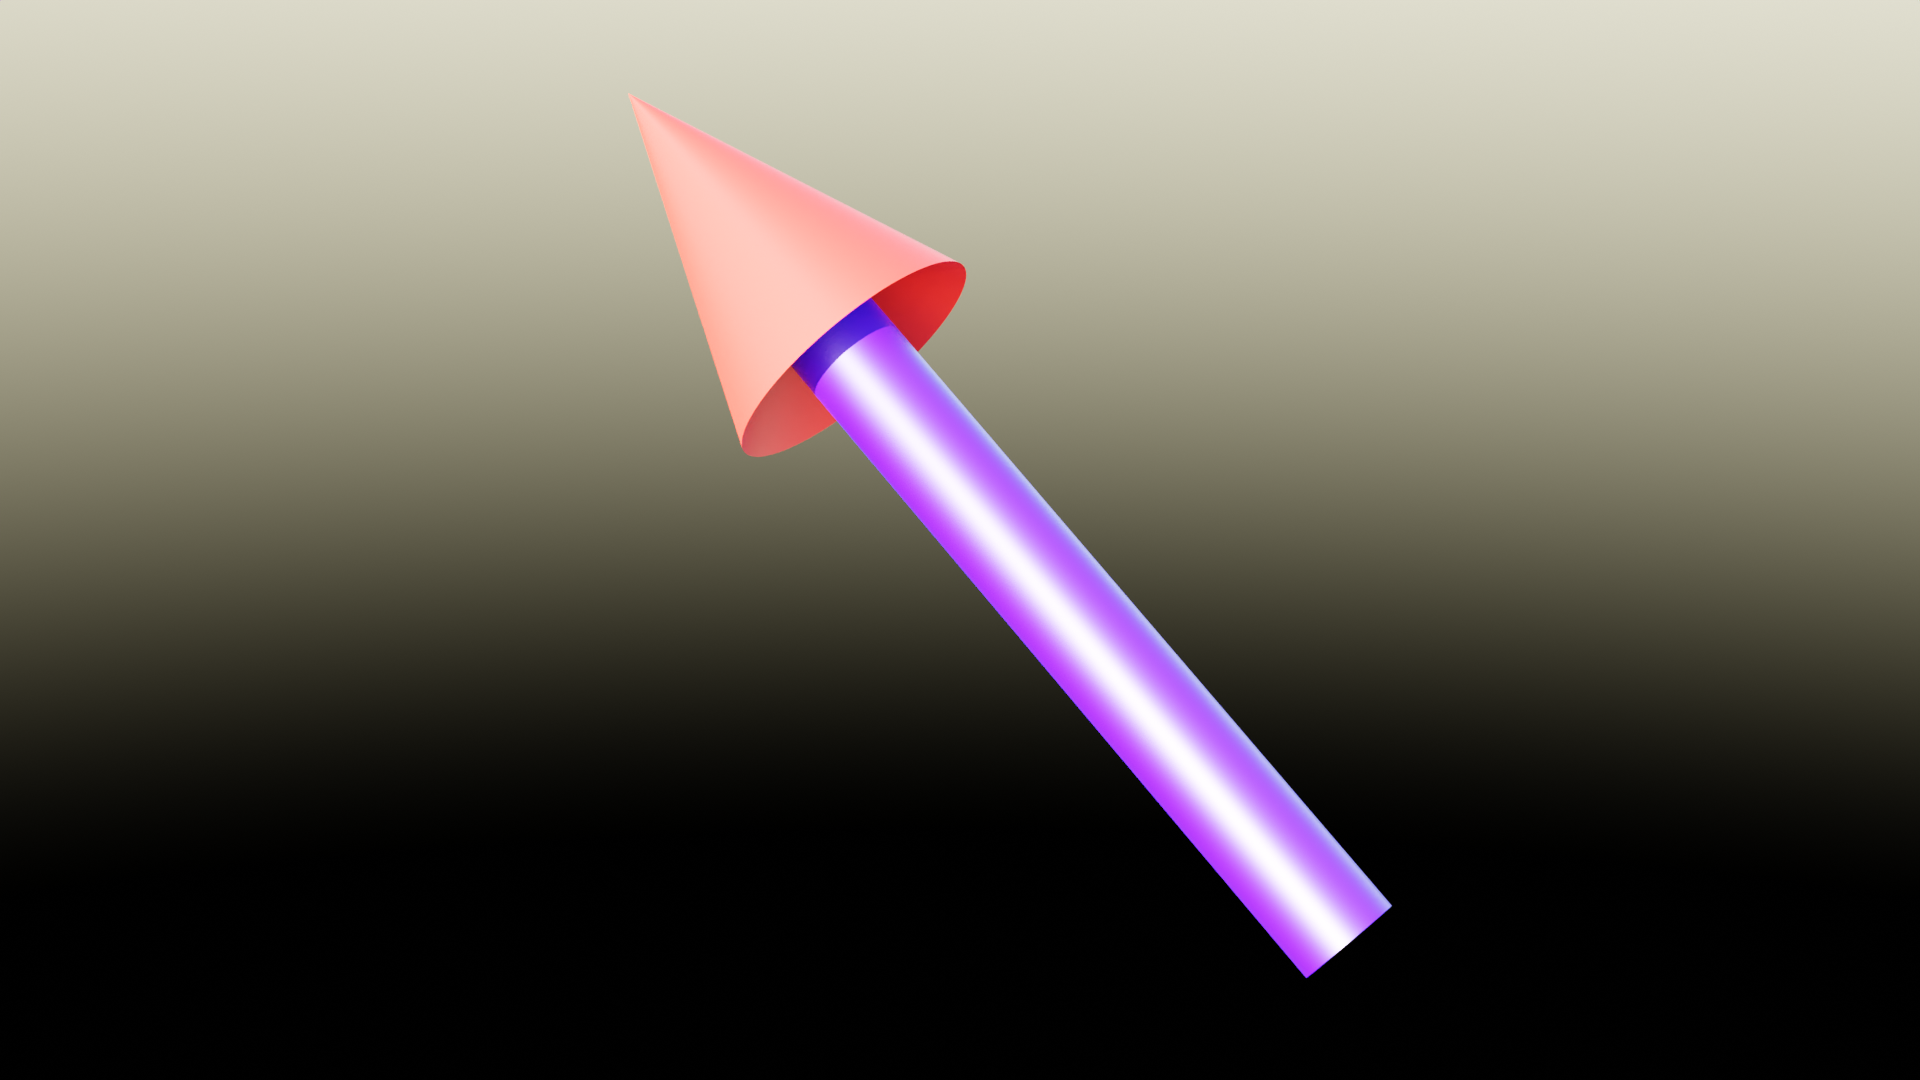
下图显示了我们想要构建的东西:

参数#
要创建的参数如下:
Name |
Type |
Description |
|---|---|---|
Length |
Float |
箭头的总长度,包括箭头 |
Radius |
Float |
箭杆半径 |
Head size |
Float |
箭头头部的大小,表示为箭杆半径的倍数 |
Head angle |
Float (Angle) |
箭头尖峰的角度 |
Recess |
Float |
箭轴穿透箭头的“深度”有多深 (0: flat, 1: max) |
Vertices |
Integer |
定义初始圆环的点数,点数越多,圆越光滑 |
稍后我们将添加补充参数,但目前,这些参数允许构建箭头。好的做法是在树的开始处声明参数。
import numpy as np
import geonodes as gn

with gn.Tree("Arrow") as tree:

    length    = gn.Float.Input(1, "Length", min_value=0)
    r         = gn.Float.Input(0.1, "Radius", min_value=0.001)
    s         = gn.Float.Input(2, "Head size", min_value=1.001)
    angle     = gn.Float.Angle(np.radians(20), "Angle", 、
                min_value=np.radians(10), max_value=0.999*gn.pi/2)
    k         = gn.Float.Input(0.5, "Recess", min_value=0., max_value=0.99)
    vertices  = gn.Integer.Input(12, "Vertices", min_value=3)
数学计算#
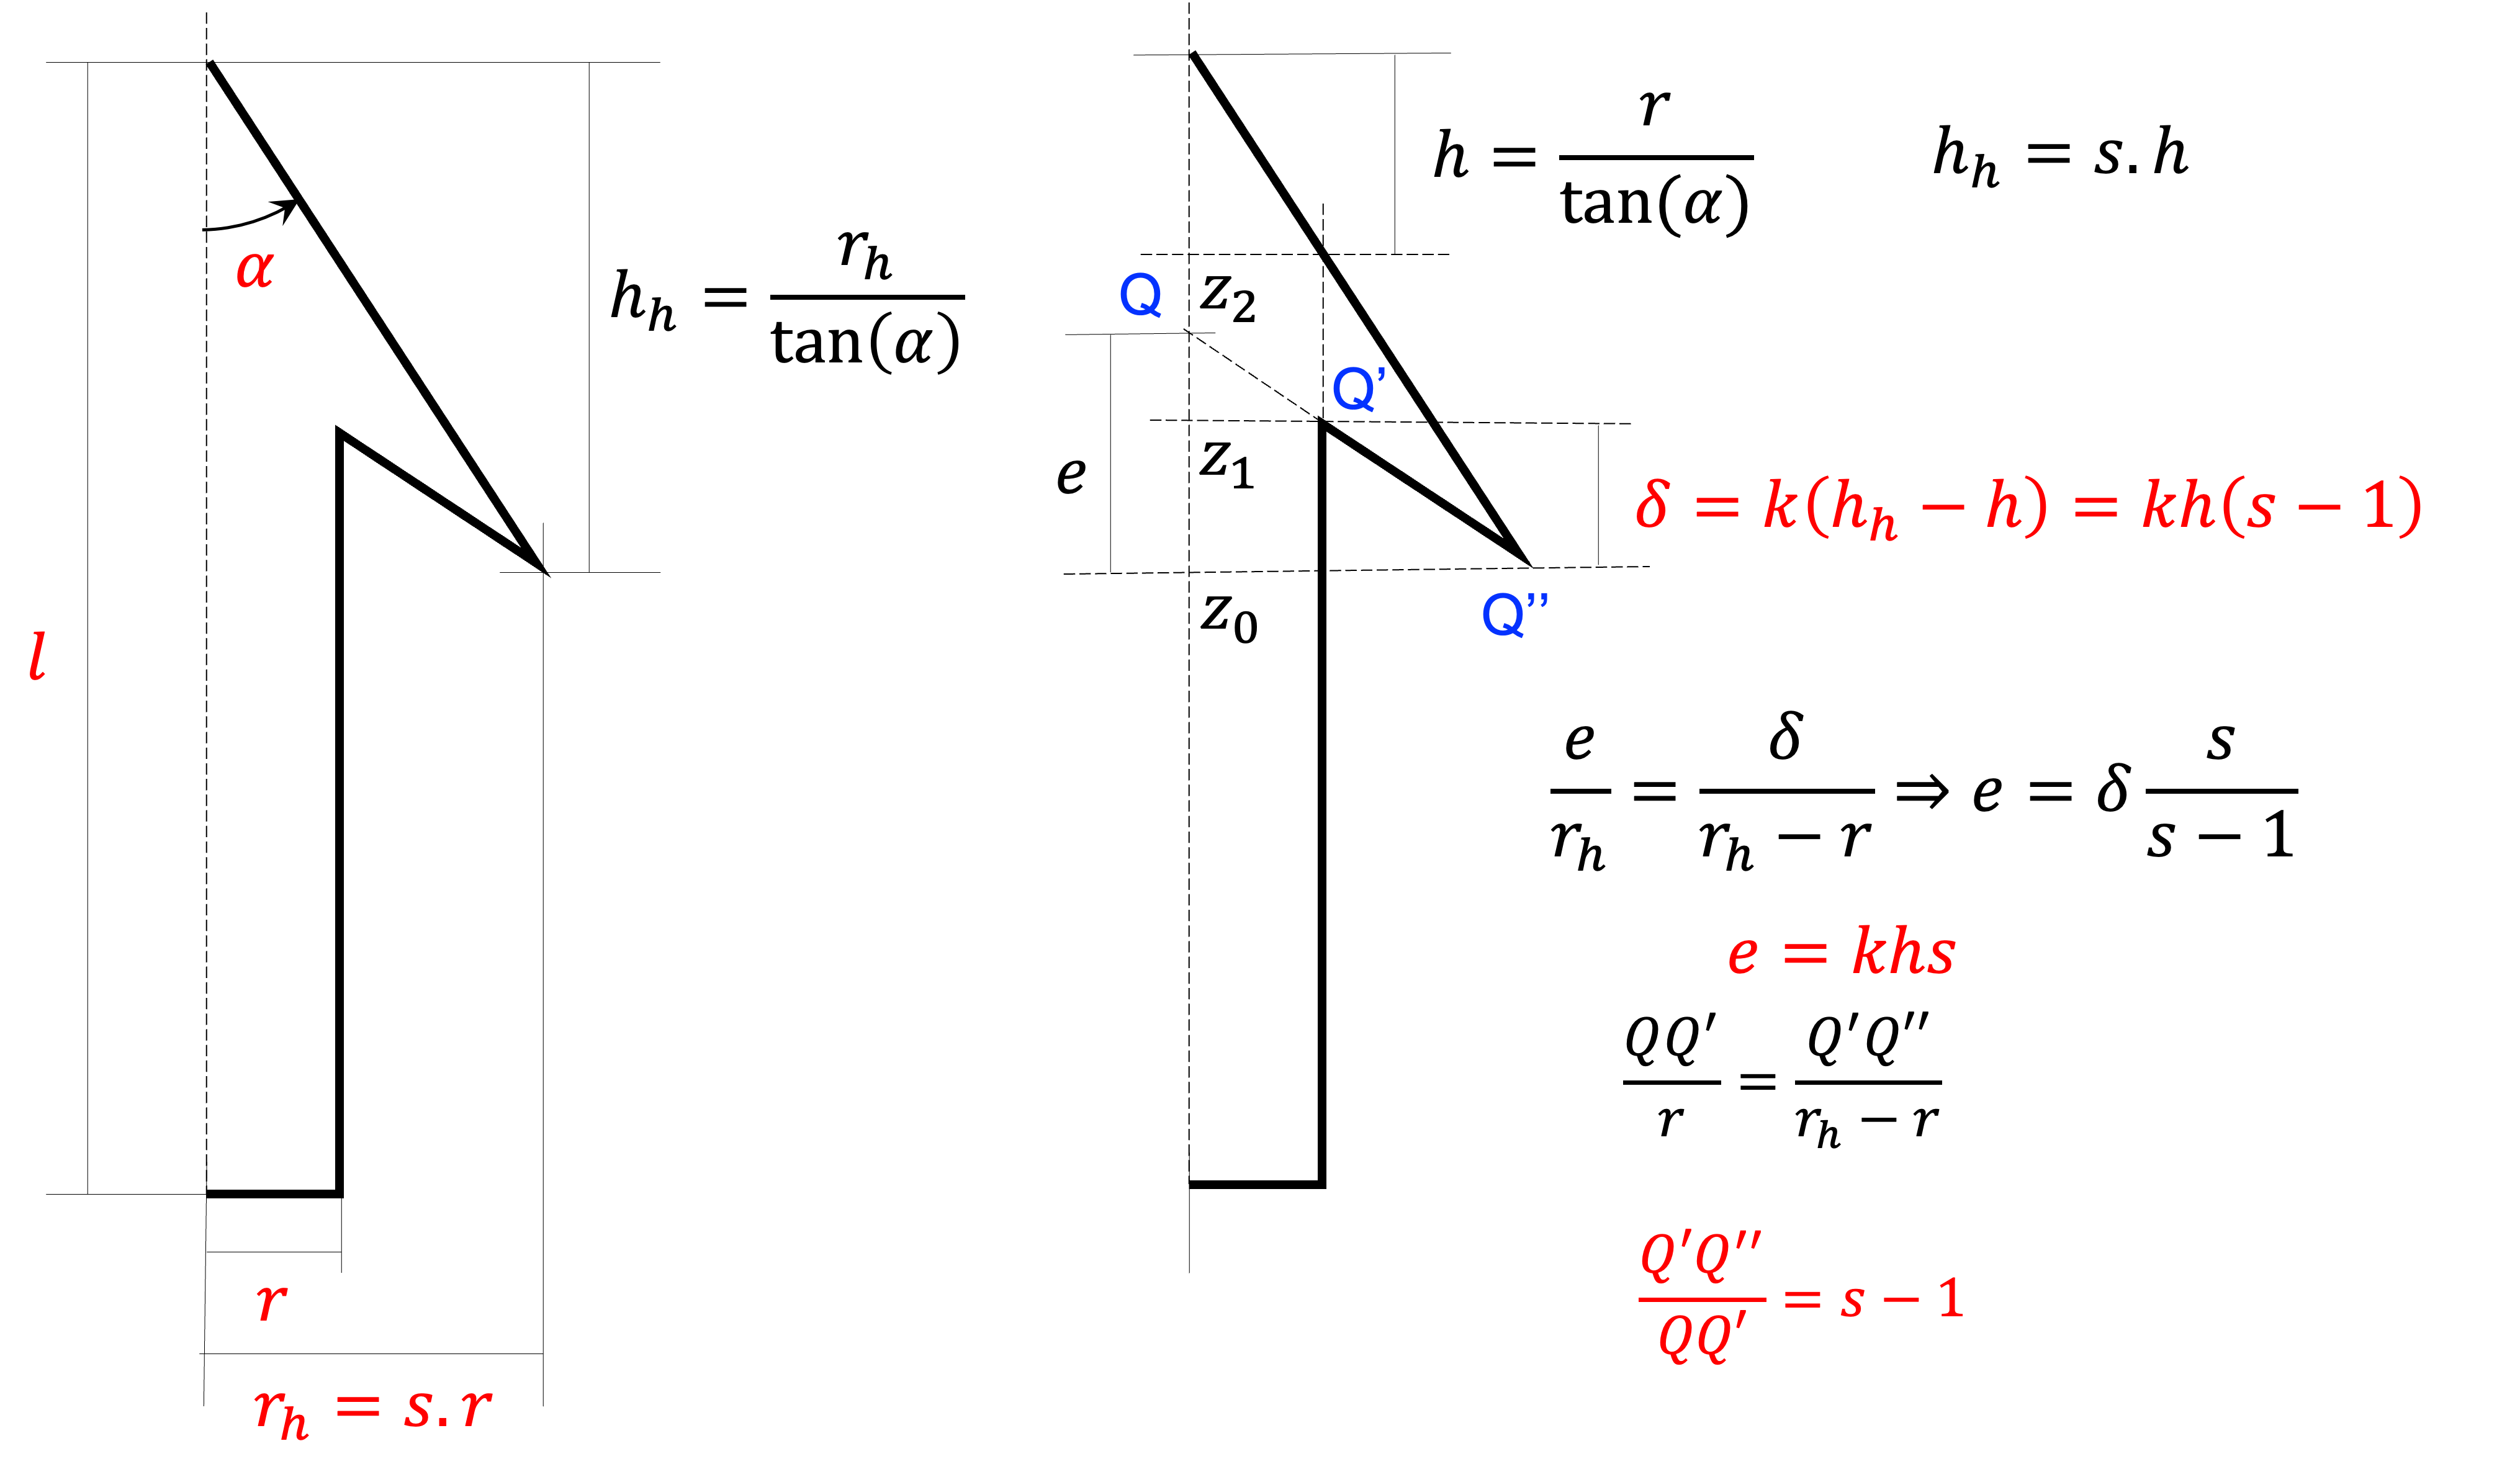
我们将通过沿着z轴向上挤压一个基盘来构建箭头,然后扩大圆柱体来构建箭头。根据参数构建箭头需要一些数学运算。

下面给出了相应的python代码:
    # ----- Arrowhead radius from the shaft radius

    rh = r*s

    # ----- Arrowhead height from the angle

    tg = gn.tan(angle)
    hh = rh/tg
    z0 = length - hh

    # ----- Recess computation

    h  = r/tg
    d  = k*h*(s - 1)

    z1 = z0 + d
    z2 = z0 + k*h*s
边缘挤出#
起点是一个圆盘:
arrow = gn.Mesh.Circle(vertices=vertices, radius=r, fill_type='NGON')
上面计算了轴的长度,它等于z1。因此,轴是通过挤压圆盘边缘到z1来建造的:
    edges = arrow.edges
    top, _ = edges.extrude(offset=(0, 0, 1), offset_scale=z1)
挤出方法返回两个布尔选择。第一个是对挤压边缘的选择,第二个是对侧面的选择。这些面孔目前是没用的。在最终版本中,我们将设置材质的面,我们将收集面。
下一个挤压步骤是向下和向外挤压边缘。在上面的方案中,我们在点Q’,想要挤压到点Q’。挤压方向由矢量QQ’给出。挤压量由数学公式给出。
Note
当点Q唯一时,点Q’和点Q”是多个(形成轴的上圆的点)。
top, _ = edges[top].extrude(offset=edges[top].position - (0, 0, z2), offset_scale=s - 1)
要完成箭头,我们只需从当前位置挤压到箭头顶部:
top, _ = edges[top].extrude(offset=(0, 0, length) - edges[top].position)
第一个版本#
第一个版本的箭头是这样的:
import numpy as np
import geonodes as gn

with gn.Tree("Arrow") as tree:

    length    = gn.Float.Input(1, "Length", min_value=0)
    r         = gn.Float.Input(0.1, "Radius", min_value=0.001)
    s         = gn.Float.Input(2, "Head size", min_value=1.001)
    angle     = gn.Float.Angle(np.radians(20), "Angle", \
                min_value=np.radians(10), max_value=0.999*gn.pi/2)
    k         = gn.Float.Input(0.5, "Recess", min_value=0., max_value=0.99)
    vertices  = gn.Integer.Input(12, "Vertices", min_value=3)


    with tree.layout("Maths stuff..."):

        # ----- Arrowhead radius from the shaft radius

        rh = r * s

        # ----- Arrowhead height from the angle

        tg = gn.tan(angle)
        hh = rh / tg
        z0 = length - hh

        # ----- Recess computation

        h  = r / tg
        d  = k * h * (s - 1)

        z1 = z0 + d
        z2 = z0 + k * h * s

    # -----Extrusion

    arrow = gn.Mesh.Circle(vertices=vertices, radius=r, fill_type='NGON')
    edges = arrow.edges

    top, _ = edges.extrude(offset=(0, 0, 1), offset_scale=z1)

    top, _ = edges[top].extrude(offset=edges[top].position - (0, 0, z2), offset_scale=s - 1)

    top, _ = edges[top].extrude(offset=(0, 0, length) - edges[top].position)

    # ----- Output the arrow

    tree.og = arrow
边和顶点的位置#
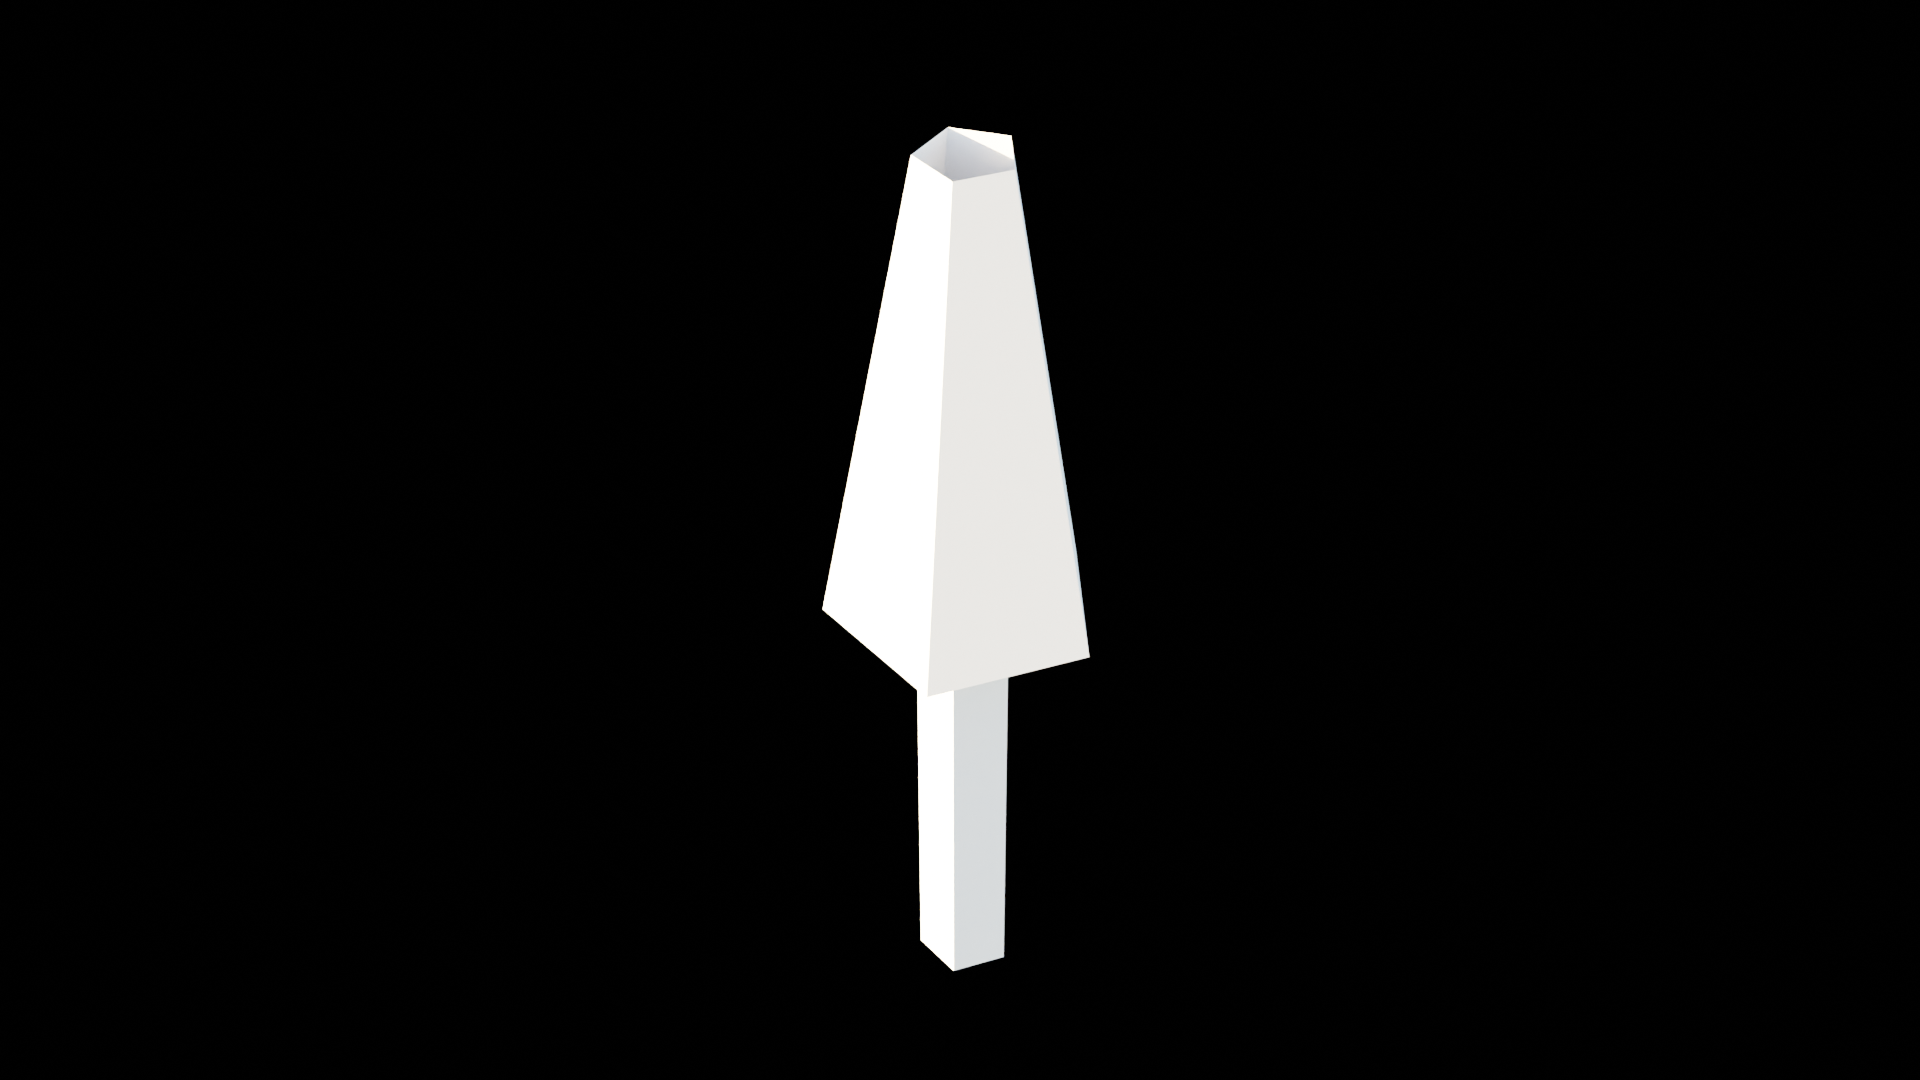
箭头看起来不错,但顶点数量少时出现了一个问题:顶点不在箭头顶部连接。例如,有5个顶点,箭头如下所示:

这是因为我们利用边缘的位置来挤压边缘。边的位置应该在一个圆上,而实际上,边的位置是它们两个顶点的平均值。当边的位置在圆内时,顶点在圆上。挤压指示在边上,但操作在顶点上。顶点的位置是从它们所在的两条边的位置中扣除的。这个计算位置甚至更靠近圆盘内部。
为了纠正这一点,我们必须用顶点数计算出的因子来纠正边的位置。这是圆的精度问题导致的,更正如下:
    # ----- polygon correction factor
    # Extrusion uses edge position which is the mean of the two
    # extremities. The vertices position is then computed as the mean
    # of the two edges. Twice a cosine factor

    f = 1 / gn.cos(gn.pi / vertices) ** 2
    fac = gn.Vector((f, f, 1))
然后:
    top, _ = edges[top].extrude(offset=edges[top].position*fac - (0, 0, z2), offset_scale=s - 1)

    top, _ = edges[top].extrude(offset=(0, 0, length) - edges[top].position*fac)
材质#
我们想应用材质:一个材质赋予箭杆和另一个材质赋予给剩下的。
Material是faces的属性,然后我们将代码修改为:
获取材料作为输入
得到挤压的面
把材料放到面上
    # Materials to apply

    shaft_mat = gn.Material.Input(None, "Shaft")
    head_mat  = gn.Material.Input(None, "Arrowhead")

    # ...

    arrow = gn.Mesh.Circle(vertices=vertices, radius=r, fill_type='NGON')

    # Apply the material to the base disk

    arrow.faces.material = head_mat

    # Applying material to extruded faces

    top, sides = arrow.edges.extrude(offset=(0, 0, 1), offset_scale=z1)
    arrow.faces[sides].material = shaft_mat

    top, sides = edges[top].extrude(offset=edges[top].position*fac - (0, 0, z2), offset_scale=s - 1)
    arrow.faces[sides].material = head_mat

    top, sides = edges[top].extrude(offset=(0, 0, length) - edges[top].position*fac)
箭头朝向#
我们要确定箭头的方向。方向可以是参考对象方向的副本,也可以是目标对象的跟踪。
我们需要添加一个对象和一个布尔选项来指示如何使用该对象:
    obj       = gn.Object.Input(None, "Orientation")
    track_obj = gn.Boolean.Input(True, "Track", description="Track object if True, copy rotation otherwise")
在标准python中,我们将使用if语句。
但在这里,我们需要计算两个方向并使用交换节点:
    rot_copy  = obj.rotation(transform_space='ORIGINAL')
    loc       = obj.location(transform_space='RELATIVE')
    rot_track = gn.Vector.AlignToVector(vector=loc, axis='Z')

    arrow.transform(rotation=rot_copy.switch(track_obj, rot_track))
最后的版本#
最后的代码包括一个平滑选项。
Note
你可能想给箭头添加一个细分表面修饰符。为了得到一个好的结果,我们必须给“水平”边添加一个折痕属性等于1。但在写这个教程的时候,Blender中有一个已知的 bug (T99310),当你试图设置名为“crease”的属性时,它会崩溃。代码使用“等待”的名称,而不是“crease”。
from imare import *
init_modules(__file__, "imare", "geonodes")
flush_data()

import geonodes as gn
from geonodes.nodes import nodes
import numpy as np

rad = np.radians

mat_a = bpy.data.materials.new("a")
mat_a.diffuse_color = (1, 0, 0, 1)

mat_b = bpy.data.materials.new("b")
mat_b.diffuse_color = (0, 0, 1, 1)

with gn.Tree("坐标计算", group=True):
    # fmt:off
    l = gn.Float.Input(1,       "Length",    min_value=0)
    r = gn.Float.Input(0.1,     "Radius",    0.001)
    s = gn.Float.Input(2,       "Head size", 1.001)
    α = gn.Float.Angle(rad(20), "Angle",     rad(10), rad(89.999))
    k = gn.Float.Input(0.5,     "Recess",    0,       0.99)
    # fmt:on

    # 箭头半径 = 箭杆半径 * 系数
    rh = r * s

    tg = gn.tan(α)

    hh = rh / tg
    z0 = l - hh

    h = r / tg
    d = k * h * (s - 1)

    z1: gn.Float = z0 + d
    z2: gn.Float = z0 + k * h * s

    z1.to_output("z1")
    z2.to_output("z2")

with gn.Tree("坐标修正", group=True):
    vertices = gn.Integer.Input(12, "Vertices", min_value=3)

    f = 1 / gn.cos(gn.pi / vertices)**2
    fac = gn.Vector((f, f, 1))

    position = nodes.Position().position

    corrected_pos = position * fac

    corrected_pos.to_output("Position")

with gn.Tree("Geometry Nodes", reroute=False) as tree:
    # fmt:off
    l = gn.Float.Input(1,       "Length",    min_value=0)
    r = gn.Float.Input(0.1,     "Radius",    0.001)
    s = gn.Float.Input(2,       "Head size", 1.001)
    α = gn.Float.Angle(rad(20), "Angle",     rad(10), rad(89.999))
    k = gn.Float.Input(0.5,     "Recess",    0,       0.99)
    # fmt:on

    vertices = gn.Integer.Input(12, "Vertices", min_value=3)

    corrected_pos = getattr(gn.Trees(), "坐标修正")(vertices=vertices).position

    z = getattr(gn.Trees(), "坐标计算")(length=l, radius=r, head_size=s, angle=α, recess=k)
    z1, z2 = z.z1, z.z2

    # -----Extrusion

    arrow = gn.Mesh.Circle(vertices=vertices, radius=r, fill_type='NGON')

    arrow.faces.set_material("a")

    top, sides = arrow.edges.extrude(offset=(0, 0, 1), offset_scale=z1)

    top, sides = arrow.edges[top].extrude(offset=corrected_pos - (0, 0, z2), offset_scale=s - 1)
    arrow.faces[sides].set_material("b")

    top, sides = arrow.edges[top].extrude(offset=(0, 0, l) - corrected_pos)

    obj = gn.Object.Input(None, "Orientation")
    # obj = nodes.ObjectInfo(obj)
    rot_copy: gn.Vector = obj.rotation(transform_space='ORIGINAL')
    loc = obj.location(transform_space='RELATIVE')
    rot_track = gn.Vector.AlignToVector(vector=loc, axis='Z')

    arrow.transform(rotation=rot_copy.switch(True, rot_track))

    # ----- Output the arrow

    tree.og = arrow

Tree({
    O.cube @ "Cube": {
        Mod.geometry_nodes: {
            "node_group": "Geometry Nodes",
        },
    },
}).load()